
Triumph Alternator Diagnosis and Repair
“Five bucks! That’s all for the core?”
A few months ago, when my alternator ceased charging my car’s battery, I took it to a local armature shop for exchange on a rebuilt unit. Considering what they offered me for my old unit, against the $100 for the rebuilt, I decided to keep it, take my time to diagnose the cause of failure, correct the defective component, and keep it for an immediate spare when I need it.
Diagnosing the problem was easy. Even the defective regulator was reasonably cheap (about $18 locally) and easy to replace. Explaining the process to someone else, perhaps with a slightly different wiring harness, regulator, or diode pack gets more complicated.
This article is aimed at those who enjoy diagnosing and repairing things, either to save a buck or just to be able to say they did it. For others it may provide a little more basic insight into how alternators work. Just for a disclaimer, there are some off-the-wall problems these testing procedures can miss (broken insulation on the field or stator winding comes to mind). I’ve tried to present simple testing that will catch the most likely problems.
As with any other auto component that’s been around for more than a year or two, there are bound to be variations as manufacturers try to consolidate model lines and improve performance. Lucas alternators are no exception.
I spoke with a very helpful tech rep, Ron Hellebuyek, at Lucas Aftermarket Operations (yes, I actually spoke to the Prince of Darkness and he was darn friendly). He was able to supply me with copies of pages from ancient tomes, describing and illustrating the differences in the alternators of our car’s vintage.
In an attempt to keep this article within proper perspective I’ll only attempt to cover the 15-18 ACR models. They were used on TR6s, 7s and 8s, Spitfires and GT6s (spanning the early ’70s through 1980). TR7s and 8s with air conditioning needed the much higher current output of the 20 or 25 ACR. They all feature similar internal regulators.
Even though the three wire harness connection(s) may be different, they’re basically the same in operation. The large brown wire (# 8 or 10) is the main output to charge the battery. The smaller brown wire (#14 or 16) comes from the harness and supplies battery sensing voltage (if used by the regulator). The small brown/yellow wire goes to the “IND”icator bulb on the dash.
Alternators, just like generators, produce alternating current. Generators convert, or “rectify”, the current to DC by means of the commutator and brushes. Semiconductor devices called diodes are used in alternators to keep the current flowing in one direction. Inside our alternators are six diodes connected together electrically into a single component known as a full-wave bridge rectifier. There are 3 more diodes in the pack that direct current back to the field windings once the alternator is turning at speed. Generators employ an external regulator that controls both voltage and current flow (amps) and, by using a cut-out, prevents any reverse flow. In alternators no cut- out is needed because a good diode pack only flows current in one direction. Due to the inherent electrical characteristics of the stator/field combination at high rpms, current level is self-limiting, eliminating the need for a current regulator. To keep from over charging the battery, Lucas does employ an internal, solid state voltage regulator that maintains alternator output between 13.6 and 14.4 volts. Output is controlled by regulating the on/off duration of the “excitation” current that’s fed back to the field windings once the alternator is up to speed.
Over the years, as voltage regulators have been superseded, there have been two, three, and four-wire hook-ups inside these alternators. Some are battery sensing, some are machine (alternator) sensing, some can do both. This is where some of the confusion starts.
The four-wire (Black, Red, Yellow, White) regulator has a dual sensing, “fail-safe” feature; it can monitor both the battery and, if that connection fails, the machine. The two-wire (Black, Yellow) unit monitors available field “excitation” voltage, while the three-wire (Black, Yellow, White or Red) can monitor either the machine or the battery, depending on its connection at the diode pack. (Have your eyes started glazing over yet?) In all units the “field” connection is now made via a small strap, or “link”, between the case of the regulator and the center field brush. This has replaced a green wire found on earlier units.
Unless you know your alternator came on your car, it may have been replaced with an aftermarket rebuild using non- Lucas regulators. Original Lucas regulators had a numerical code stamped into the case. Later units have a 3 letter and 3 digit code. Now the I.D. is something like UCB 104. Without those codes assume it’s non-Lucas aftermarket. As of mid-1994 Lucas was supplying two, three, and four-wire regulators.
There are a couple of other items that may or may not be cased inside your alternator. Earlier units housed a 3 microfarad capacitor, attached between ground and the main output terminal to suppress radio noise. This was discontinued in 1979 and the part is no longer available. On newer units there’s a surge protection diode wired between ground and the “IND” (indicator) conductor. As I’m finding out on some rebuilt units, this device may or may not be in place, probably depending on the vintage of the core. The alternator will work without it, but it does serve a purpose. This device is a zener diode, installed to protect the regulator’s main output transistor. It absorbs high transient voltage caused by a faulty connector or by removing a battery cable while the engine is running. This diode is still available from Lucas and, if you’re missing it, you may want to get one. (Check your parts catalogs for Lucas # UZB 106, cost is about $9)
Allow me to drive this point into your cranium; surge diode or no, NEVER, EVER, REMOVE EITHER BATTERY CABLE WHILE THE ALTERNATOR IS SUPPLYING CURRENT TO THE HARNESS. In less that a heartbeat an overvoltage spike could destroy a perfectly good regulator, or worse. ‘Nuff said?
OK, out of nowhere, your “IGN” light starts glowing, where do you start? That little glow indicates an electrical imbalance between the alternator and the battery.
The warning light circuit also supplies a small current, via the “IND” terminal, to the field coil when the ignition is switched “on”. That in turn sets up a magnetic field, or “flux”, within the field coil. Then, by spinning that magnetic field inside the stator windings, the alternator generates electricity. Once the car starts, the field becomes “self excited” and no longer needs current from the warning light circuit. If the alternator produces voltage that’s less than the battery (or none at all), current continues to flow from the battery through the bulb and it continues to glow. If, after the car starts, the output voltage of the alternator equals the voltage at the battery terminals no current can flow because both terminals of the bulb have the same “potential”.
If your battery goes flat and the bulb never comes on, you can check the operation of the bulb and it’s wiring. After recharging the battery, and with the engine off, disconnect the plug that attaches the brown/yellow wire to the back of the alternator and turn the ignition switch “on”. Using a jumper wire, ground the brown/yellow wire. The bulb should light. If it doesn’t, find out why. The bulb is either burned out or there’s a bad connection.
When your bulb starts glowing or the dashboard gauge shows a no- charge condition, see if charging current is reaching the battery. With the engine running at high idle (1500 rpm), measure the voltage at the battery terminals using a volt/ohm meter (VOM); digital is more accurate, but for this test an analog needle will work fine. On high idle, the voltage at the terminals should be between 13.6 and 14.4 volts. Outside that range indicates bad or dirty connections or defective alternator.
The shop manuals recommend test procedures, but they require a specialized set-up. Easier, take the alternator into a TRAK or one of the armature shops for a bench test. Chances are they’ll tell you it’s dead. They won’t tell you what’s wrong, they’ll just want to sell you another unit.
Barring physical damage (engine fire, broken casing, etc.), there are only a couple things in an alternator that can fail. Bearings can fail from over tightened belts or age — usually the one at the pulley end goes first. A medium sized gear puller and an $8 SKF brand bearing (#6202-2Z or equiv.) can it put right. Brushes, the carbon type that conducts “flux” current to the field coil through the slip rings, will last for 75-100 thousand miles and are cheap — about $2 for the pair — to replace. Renew them if they’re shorter that 1/4″.
Electrically, the stator and field windings are pretty durable, again, barring physical damage. That leaves the diode pack or regulator for likely failure. The stator, field windings, and diode pack can all be checked with any reasonable digital VOM (Radio Shack has a pocket sized unit, #22- 171, that sells for about $25, $18 on sale) or a self-powered 12v test lamp.
Get the alternator off the car, over to the work bench, and remove the rear plastic cover. Support the unit with the electronic component end up. See those three soldered connections near the grounding bolt? Those stator leads need to be desoldered from the diode pack. You’ll probably need a 100-125 watt soldering gun. Avoid using any more heat that necessary to prevent diode damage. Using needle-nose pliers, gently pull them away from the diode leads. Next, note how many and what color wires are coming out of the voltage regulator (that 11/2″ square metal- clad box), and where they attach. Note also any other wires and where they go. There will be at least one more jumper running from the outer field brush to the “IND” terminal. MAKE A DRAWING!
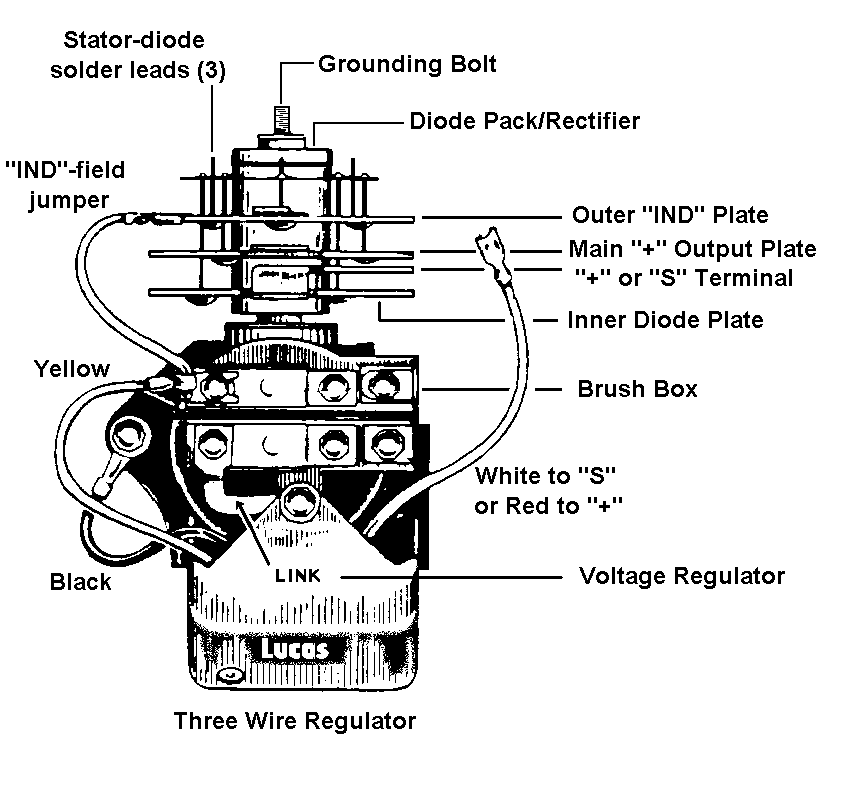
Remove the spade connectors that attach the regulator (and brush box) to the diode pack. Remove the two screws that retain the brush box/regulator assembly; you need to do this to check the brushes and get to the slip rings of the field windings.
Time to start testing. Using a digital VOM, in the “ohm” setting, or the 12v powered test lamp, begin with those unsoldered stator leads. Check resistance between all three leads. On the VOM you should get a reading of around 0.2-0.3 ohms, virtually no resistance. With the 12v lamp it should glow at full brightness. Next measure between those same three wires and that grounding bolt that holds the diode pack in place. There should be no reading, or the bulb should not light. Any other reactions here and you’ve found a bad stator.
Now that the brush box is off, check the windings of the field coil. With the VOM still in the ohm setting, probe the surfaces of the inner and outer slip rings. The copper should be nice and shiny. The reading should be around 4-7 ohms, or the bulb should light. Next, test the insulation of the rotor windings. Get one probe tip down onto a clean metal area (scrape a little if necessary) of the rotor body, then probe both slip rings, one at a time. There should be no reading or the bulb shouldn’t light. Any other reactions indicate a bad field winding, slip ring, or solder connection between the two.
All nine diodes of the rectifier need to be checked individually, but that can be done with it still in place. Remember good diodes only flow current in one direction. The diodes are tied together electrically onto three plates which serve as heat sinks and as attachment points for the alternator’s harness plug and the voltage regulator. Testing can become a little confusing to explain so I’ll break it down into numbered steps. The two outer plates have the same polarity. The inner plate, closest to the brush box, is reversed. With that in mind, set your digital VOM to the “diode” setting (the ohm setting is no good here), or power up the test lamp.
- Attach the black (-) lead to one of the spade terminals of the outermost “IND” plate. Touch the red (+) lead to each of the three diode leads (where you desoldered the stator wires). You should get a meter reading at each terminal. Using the test lamp, the bulb should light.
- Move the black lead onto the center plate and repeat the process with the red lead.
- For the third, innermost plate, reverse the leads; i.e. red to the plate, black to the diode leads.If you got a reading or the bulb lit in each of the nine tests, so far, so good. They’re all conducting in the forward direction.Now, we need to reverse the diode test procedure, and the current flow.
- Starting with the inner plate, connect the black lead to the plate and probe the diode leads with the red. There should be no reading or the bulb should not light.
- Moving back out to the middle plate, once more swap leads, puting red on the plate’s spade connector and probe the diode leads with the black.
- Finally, back to the outer plate, attach red onto the spade terminal, black on the diode leads.During the reverse part of the diode test there should be no reaction by meter or bulb.
If you find one or two bad diodes in the pack you may be able to replace the offending bits (30 amp, 100 volt), but the whole diode pack can be replaced for about $15; by the time you find the parts, try to cobble them in . . .why bother. If there are two or more diodes out, consider the regulator faulty also. Replace both units.
There are involved ways to check the regulator, but if the brushes, stator, field windings, and diode pack check out, chances are real good that replacing the regulator will get the alternator back in service.
When replacing a regulator on a 15 through 18 ACR (or the 20 or 25 ACR), replacement by one with the same wire count as the original is quickest and most desirable.
The only difference between the three and four-wire regulators is the dual-sensing capability provided by the fourth wire; the white provides battery sensing while red provides machine sensing. A three-wire will replace a four-wire unit by disregarding the fourth wire connection.
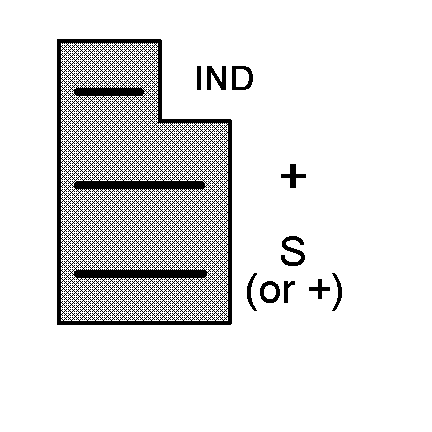 On three-wire units, the white wire will attach to the “S” terminal (where the smaller brown harness plug wire attaches); that makes it a battery sensing unit. A red wire from the regulator will attach to a “+” main output terminal of the diode pack (where the larger brown plug wire attaches); it’s a machine sensor. Black and yellow will go back to ground and the outer field brush respectively. A four-wire unit will replace a three-wire by simply connecting the additional red or white wire to the other appropriate terminal.
Two-wire units, with just a black and yellow lead, monitor the voltage values of the “IND” exciter circuit. No external sensor is required. Attach the black lead to ground and the yellow lead to the outer field brush terminal.
When reattaching the wires, don’t forget that little jumper wire that runs from the outer field brush to the “IND” spade.
In a conversation with Dave at The Roadster Factory, they carry three-wire regulators. When I checked with my local rebuild shop (Arlington Armature), they carry a two-wire and, even though their computer listing said three, a four- wire unit. When I called Motorhead, they had a NOS on the shelf, circa 1976, with a green and yellow wire — who knows?
Now, if you have an earlier model TR with a five-wire, two plug connection on the back of your 15 AC alternator, there’s an update kit that will allow you to convert your wiring harness to the newer, single, three-prong connector. Since that older style alternator is getting harder to find, the updated connector may get your TR back on the road sooner. The Lucas conversion kit part number is CYB 400. Roadster Factory carries the kit for about $6. It probably wouldn’t be a bad idea to have one on hand.
I can guarantee I have not covered all the possibilities in Lucas alternator wiring configurations, but I have tried to cover the ones most likely found in our cars. If, and when, your alternator forgets how to work, try to rebuild it yourself. If time doesn’t permit, buy the rebuilt, but hang onto the core and rebuild it for a spare. You just never know when you’ll need a back up.